Deploying your Django app on Railway
The Heroku alternative you've been looking for
In this article, we will be deploying our Django app on Railway. Railway is a Platform as a Service (PAAS) and they offer web server and database hosting which is sufficient to deploy our app to the web.
Before moving on with this tutorial, there is a prerequisite which is detailed in this guide. You can call it pre-deployment. Please go through it and come back once it's checked ☑️
Also, you need to create an account on Railway(obviously).
Now, let's begin.
Installing Nixpacks
Run the command below in your terminal if you use Ubuntu or WSL2. Else you can check for other methods here.
curl -LO https://github.com/railwayapp/nixpacks/releases/download/v2.0.11/nixpacks-v2.0.11-amd64.deb sudo dpkg -i nixpacks-v2.0.11-amd64.deb
Installing Railway CLI
You can install this using the shell script below if you're on macOS, Linux or Windows via WSL. Just run the command in your applicable terminal. You can check for other methods here.
bash <(curl -fsSL cli.new)
Login
railway login
Create a Project
A project is like a Github Organization or an Heroku Pipeline that defaults to the production environment. You can also create other environments for staging, testing, etc
railway init
Associate Directory to Project
Basically, this links the current directory (folder) you're in, to your Railway project. Very useful, especially as you can have multiple projects.
railway link
Navigate with the arrow keys and hit enter to select a project.
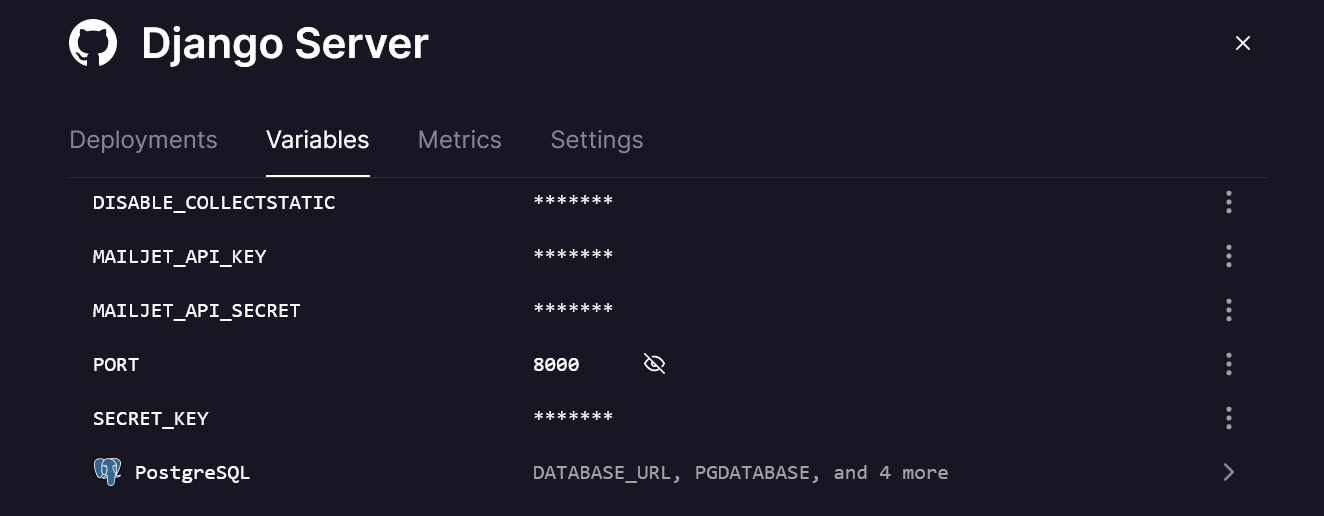
Environment Variables
Railway may have asked you to let them set up your environment variables from your .env file while you were deploying with railway up. That works but you may want to modify or add more. To see all existing environment variables, run
railway variables
To set or modify a variable
railway variables set {VARIABLE_NAME}:{VARIABLE_VALUE}
Procfile
Procfiles are a popular format used to specify a web/release process. To use this you need to create a Procfile in your root directory.
touch Procfile
Then paste this into it
web: gunicorn {YOUR_DJANGO_PROJECT_NAME}.wsgi

release: python manage.py migrate
Deploy
At this point, our app should be ready for a smooth deployment. You can do this with
railway up
It then builds and deploys your app on Railway 🎉
Nixpacks
If you had a successful deployment, you can skip this. However, if you have a psycop2g dependency, you'll run into an error while trying to deploy (as at the time of writing this). The fix for this is to install a postgresql nix package. First, create a file called nixpacks.toml in your root directory touch nixpacks.toml Then paste this snippet into it [phases.setup] nixPkgs = ["...", "postgresql"]
Port
After deploying your app, you need to set up a port number as Railway doesn't do this for us out of the box. Login to Railway on your web browser. Navigate to your project, then to your web deployment, then to your settings, and then set your port to 8000 as is the default for Django. Or whatever you want to use.
Shell commands
There are where we would need to run some commands directly in the hosted environment. With Railway, we can do this in a subshell that makes use of our hosted app's variables.
railway shell
This opens up that subshell. And for example, we can then create a superuser as we usually do with
python manage.py createsuperuser
Domain name
After our app is deployed, we need to generate a domain name for it so that it becomes accessible as Railway does not generate one by default. Pretty much the same process for setting up our port earlier.
End
And that's all that needs to be done! Thanks for following through to the end, and let me know if you encountered any issue not mentioned here.
¡Hasta luego!